Abstract
In my previous article I described a way to send data to a feed created on pachube to store data that came from a temperature sensor of my laptop. The article was intended to show the procedure that has to be followed to send data to pachube's feed.
In this article I am going to show you how to obtain data from a lm35 (temperature) sensor attached to a arduino like board (pinguino), send them to pachube's feed and then visualize the data using Komposer.
Sending temperature data to pachube using pic based microcontroller
The first thing that we have to understand is the whole picture. The following image shows you how is the relationship among the different components.
The components required are:
1x LM35 Precision Centigrade Temperature Sensor
1x Pic 2550 based Pinguino (arduino like board) or arduino board(1)
1x PC using linux (I use Ubuntu 11.10) with python installed
The above image shows the LM35 sensor attached to the microcontroller which is responsible for reading the analog pin where the sensor is attached, calculates an average of the values red and converts them to centigrades, then send this value through the serial port to the PC.
The PC will receive the values through the serial port where a python script is in charge for reading each value of temperature and send it to pachube's feed (previously created on pachube's web site).
A third component is related to the way we can access the data in a form of a charts such that we can easily see temperatures trends over an hour, a day or a week. This component is a simple static web page created with komposer.
Firt things first
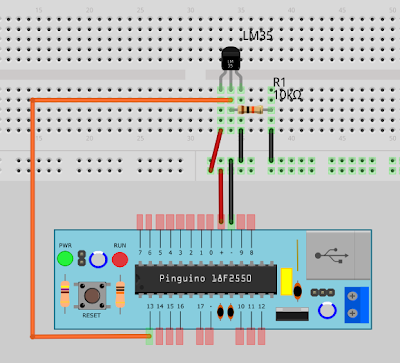
The first thing we have to solve is reading the sensor from the microcontroller. To do this we have to have the components and attach them using a protoboard.
I have used fritzing to do this model where you can see the lm35 attached to the pin13 of our pinguino. The pin 13 is analog so it is suitable to read different voltages (0-5V). The LM35 is very simple to connect and read. It has only 3 pins (VCC, VOUT, GND). This link has a very good tutorial of how to read and convert the Vout value so the reading sent to the serial port is easily read in its final scale.
For this schematic we have used a pull-up 10K resistor due to the fact that pinguino 2550 lacks of these internally. VCC and GND comes directly from the pinguino VCC and GND.
With this all set on our protoboard it is time to load the code on the micro using the 32 bit Pinguino's IDE.
byte pinTemp=14;
void setup()
{
pinMode(pinTemp,INPUT);
}
float temp(byte pin, int n, int milis)
{
int i=0;
int valorPin=0;
//read cycle defined by n iterations waiting (millis) milliseconds
for (i=0; i<n; i++)
{
valorPin= valorPin + analogRead(pin);
delay(milis);
}
//return the average value coverted to celcius
return (5.0 * (valorPin/n) * 100.0)/1024.0;
}
void loop()
{
CDC.printf("%d\n", (int)temp(pinTemp,100,600));
}
A little explanation of the code:
1) On the setup() block we initialize the pin as an analog input.
2) On the loop() block we print the result to the serial port using CDC and the custom temp() function.
3) On the temp() function we calculate the average of 100 values red with analogRead(), each one executed every 600 milliseconds, then return the value converted to centigrades.
With 100 reads each one executed every 600 millis we will obtain a temperature value every minute or so. This value is sent to the serial port (/dev/ttyACM0) and can be red with the following script using python.
#!/usr/bin/python
"""
tempLM35.py
"""
import os.path
from datetime import datetime
import serial
import signal
import sys
import subprocess
import eeml
pachubeURL="/v2/feeds/47024.xml"
pachubeKEY="bfr0eqPG26CdsRgwTOrgIPZV86DRGJr1q9Ept4ZjaJ8"
#Verificacion del parametro indicando el puerto serial /dev/ttyXXX
if len(sys.argv) > 1:
if os.path.exists(sys.argv[1]):
puerto = sys.argv[1]
else:
print "El puerto especificado %s no existe!" % (sys.argv[1])
sys.exit(1)
else:
print "uso: showSerial.py /dev/ttyXXXX"
sys.exit()
#Apertura puerto serial
try:
ser = serial.Serial(puerto, 9600)
except (serial.ValueError, serial.SerialException):
print "\n::Error::\n Puerto=%s" % (puerto)
sys.exit(2)
#Funcion para el catch del ^C
def signal_handler(signal, frame):
print ' Saliendo...'
ser.close()
sys.exit(0)
signal.signal(signal.SIGINT, signal_handler)
pachube = eeml.Pachube(pachubeURL,pachubeKEY)
#while 1:
try:
result=ser.readline()
except serial.SerialException:
print "\n::Error::\n Puerto=%s" % (puerto)
sys.exit(2)
result=result.replace("\n","")
pachube.update([eeml.Data(0, result, unit=eeml.Celsius())])
pachube.put()
print "("+str(datetime.now())+") --> "+result+" Celsius"
At the end of this code we use the eeml library to update and send one value to the feed 47024 referred with pachubeURL variable using our unique key for authentication (pachubeKEY).
This script have to be executed each time we decide to obtain a value from the serial port and send it to pachube's feed. Linux give us a tool called cron. Updating the crontab to execute the script every minute allows us to send the data at the same rate of the microcontroller.
* * * * * /home/ydirgan/SCRIPTS/pachube/tempLM35.py /dev/ttyACM0 >>/home/ydirgan/SCRIPTS/pachube/tempLM35.out 2>&1
The last line of the python script prints out the following formatted line (ie):
(2012-02-27 12:18:19.740213) --> 28 Celsius
(2012-02-27 12:19:10.317034) --> 29 Celsius
(2012-02-27 12:20:51.447645) --> 28 Celsius
(2012-02-27 12:21:41.929904) --> 28 Celsius
As you can notice on the cron entry above, the script is executed redirecting the referred output to tempLM35.out which will contain the historical values red from the sensor. This file can be used to create a chart on (i.e.) a libreoffice spreadsheet utility. Instead, we use pachube to store that data and let it to create the charts.
Finally using the same technique from our last article (using komposer) we can show the charts in one page and using labels to identify the charts and to make easier the interpretation.
Using an auto-load plugin on the browser you can keep up to date this page to see what is going on with the temperature of the room.


